
reglage du dynojet stage 2
Page 1 sur 1

reglage du dynojet stage 2
par "Hunter" 1/11/2013, 18:27
reglage du dynojet stage 2
Before doing this install I would suggest reading through the stage 1 information. Since I was going to install a stage 2 setup on my bike I decided to document it so others can see the steps and find out more information about their bike without tearing it apart themselves. Remember, You must have a stage 1 installed before you move on to the stage 2. Many people just do the stage 1 and 2 at the same time, I had previously installed a stage 1 kit so, unfortunately this guide is only for the stage 2. The stage 1 kits come with instillation instructions and are fairly easy to install so dont worry. I hope this helps whoever looks at it. Ok..... here we go..... I highly recommend using the repair manual for the marauder, it helped me tremendously with this install. All the tools needed for this install can be found in your toolkit provided with your bike. I was a little hesitant to start tearing into my bike and not be able to figure it out and or put it back together, but once I got the tank off and the carbs out of their intakes it was extremely simple. Obviously, first you must remove the tank off the bike. Pulling the fuel valve (the valve that allows you to move from off to on to reserve) out from the frame is a little tricky but once you remove the tank a few times it gets easier. After you get the tank off you will immediately see both front and rear carbs. They are attached to the air boxes that house the air filters. Removing these air boxes is just a matter of unscrewing a few bolts and they come right out. These screw locations are shown in the repair manual, but can easily be found without it. When doing a stage 2 install, two K&N air filters are needed. The rear airbox also has another hose attached to it leading from the top of the rear cylinder. This hose serves as a crankcase breather for the engine. If you are going to use the clamp on air filters, you must put some kind of filter on the hose, do not plug it off and I would not recommend leaving it hanging without some type of filter. I went the quality way and got a nice crankcase breather filter. Some people went other routes such as stuffing some filter foam in the tube. Either way will work. If you are using the K&N drop in filters, you do not have to worry about this.
Click here to download exploded views of the carburetors
Note: in .tif image format, most drawing or picture viewing programs support that image format
http://www.reocities.com/luke456/guide/frontcarbview.tif
http://www.reocities.com/luke456/guide/rearcarbview.tif

This is a picture of the front airbox, the rear airbox is similar in shape and size. The intake snorkel is known to block lots of air to the engine so many people usually cut it off or remove the blocked portion of the snorkel.
If you are using drop in K&N filters you simply remove the 4 screws from the intake snorkel side and the air filter comes out. Replace with the K&N, reassemble, and set aside the airboxes. Using the K&N drop in filters is the most popular method that requires no airbox modification but in this install I chose the less popular method which is using the clamp on filters. It is more difficult because you have to modify the front intake to accommodate a clamp on filter, and many people do not want to deal with those kinds of modifications. But it gives you more power and that is what i'm after


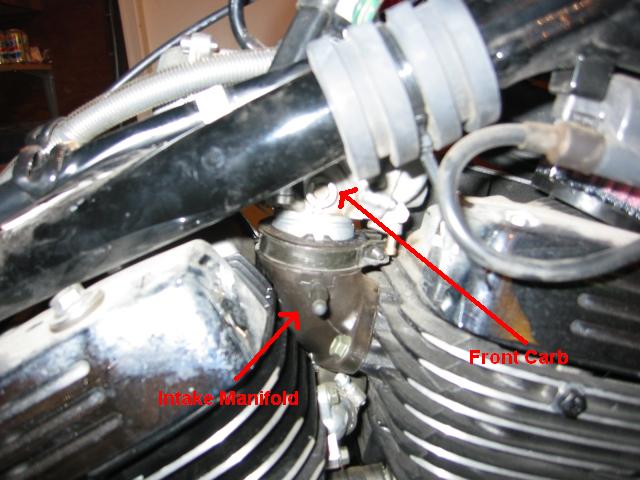
Picture of the front carb intake manifold
The next step is to remove the carbs from their intake manifolds, all you have to do is loosen a clamp that holds the carb to the intake. The rear carb must have the fuel line pulled off of it to pull the carb out. Frame struts must also be removed to allow the removal of the carbs. Their are two options after pulling the carbs out of their intakes. The first option is to completely remove the carbs to work on them on a workbench which requires the removal of the throttle cables. Carburetor synchronization must be done when the install is complete. The other option is to pull out the carbs with the cables attached and rotate them enough to get at the float bowls. That is what I did, and I think it is a much easier route. You must be careful not to disturb the throttle cables as that might bring the carbs out of sync. Carb synchronization is not necessary with the second option.

This picture shows the float bowl and the screws. The K&N clamp on filter is shown also.
Ok now that you have the carbs out and turned sideways the first step is to remove the float bowl, I started with the front carb. As you can see the throttle cables are still attached, all I did was pull the carb out and turn it sideways. Remove the 4 float bowl screws and remove the float bowl cover. When you remove the cover gas will spill out of the bowl, not much will come out but I suggest having a rag under the carb so it doesn't spill all over the bike.
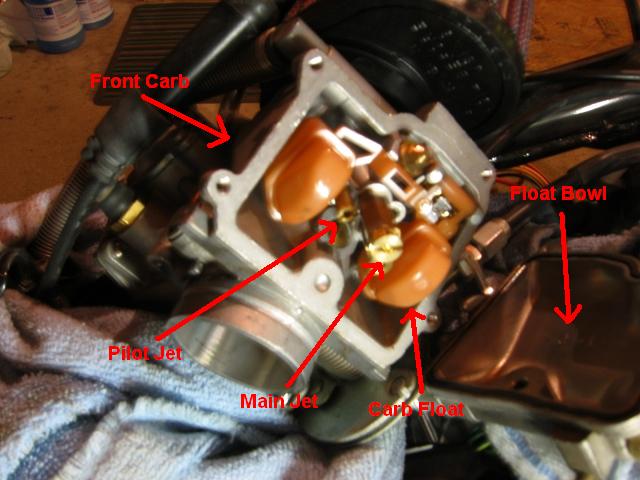
This picture is of the front carb float bowl
Locate the Main jet and the Pilot Jet (If you are replacing the pilot jet). Remove the stock jets and replace them with your new ones.

Picture of the rear carb.
The rear carb is very similar to the front, although the jets are in different locations inside the float bowl and the pilot jet looks different then the front. It is not difficult finding them. There ya go, that's all theirs to it. All you have to do is reverse the process and put the carbs back and re-attach the airboxes if you have that setup. After i got my bike re-assembled I started it up, and it ran smooth. Unfortunately it is the middle of the winter here in Wisconsin so i could only bear a ride around the block. The bike performed very well with a noticeable power increase considering it was around 10 degrees that day.
This is intended only to serve as a guide to show how the process is done. You must have some mechanical knowledge and be able to identify certain parts on a motorcycle to be successful in doing a stage 2 install.
Before doing this install I would suggest reading through the stage 1 information. Since I was going to install a stage 2 setup on my bike I decided to document it so others can see the steps and find out more information about their bike without tearing it apart themselves. Remember, You must have a stage 1 installed before you move on to the stage 2. Many people just do the stage 1 and 2 at the same time, I had previously installed a stage 1 kit so, unfortunately this guide is only for the stage 2. The stage 1 kits come with instillation instructions and are fairly easy to install so dont worry. I hope this helps whoever looks at it. Ok..... here we go..... I highly recommend using the repair manual for the marauder, it helped me tremendously with this install. All the tools needed for this install can be found in your toolkit provided with your bike. I was a little hesitant to start tearing into my bike and not be able to figure it out and or put it back together, but once I got the tank off and the carbs out of their intakes it was extremely simple. Obviously, first you must remove the tank off the bike. Pulling the fuel valve (the valve that allows you to move from off to on to reserve) out from the frame is a little tricky but once you remove the tank a few times it gets easier. After you get the tank off you will immediately see both front and rear carbs. They are attached to the air boxes that house the air filters. Removing these air boxes is just a matter of unscrewing a few bolts and they come right out. These screw locations are shown in the repair manual, but can easily be found without it. When doing a stage 2 install, two K&N air filters are needed. The rear airbox also has another hose attached to it leading from the top of the rear cylinder. This hose serves as a crankcase breather for the engine. If you are going to use the clamp on air filters, you must put some kind of filter on the hose, do not plug it off and I would not recommend leaving it hanging without some type of filter. I went the quality way and got a nice crankcase breather filter. Some people went other routes such as stuffing some filter foam in the tube. Either way will work. If you are using the K&N drop in filters, you do not have to worry about this.
Click here to download exploded views of the carburetors
Note: in .tif image format, most drawing or picture viewing programs support that image format
http://www.reocities.com/luke456/guide/frontcarbview.tif
http://www.reocities.com/luke456/guide/rearcarbview.tif
This is a picture of the front airbox, the rear airbox is similar in shape and size. The intake snorkel is known to block lots of air to the engine so many people usually cut it off or remove the blocked portion of the snorkel.
If you are using drop in K&N filters you simply remove the 4 screws from the intake snorkel side and the air filter comes out. Replace with the K&N, reassemble, and set aside the airboxes. Using the K&N drop in filters is the most popular method that requires no airbox modification but in this install I chose the less popular method which is using the clamp on filters. It is more difficult because you have to modify the front intake to accommodate a clamp on filter, and many people do not want to deal with those kinds of modifications. But it gives you more power and that is what i'm after
Picture of the front carb intake manifold
The next step is to remove the carbs from their intake manifolds, all you have to do is loosen a clamp that holds the carb to the intake. The rear carb must have the fuel line pulled off of it to pull the carb out. Frame struts must also be removed to allow the removal of the carbs. Their are two options after pulling the carbs out of their intakes. The first option is to completely remove the carbs to work on them on a workbench which requires the removal of the throttle cables. Carburetor synchronization must be done when the install is complete. The other option is to pull out the carbs with the cables attached and rotate them enough to get at the float bowls. That is what I did, and I think it is a much easier route. You must be careful not to disturb the throttle cables as that might bring the carbs out of sync. Carb synchronization is not necessary with the second option.
This picture shows the float bowl and the screws. The K&N clamp on filter is shown also.
Ok now that you have the carbs out and turned sideways the first step is to remove the float bowl, I started with the front carb. As you can see the throttle cables are still attached, all I did was pull the carb out and turn it sideways. Remove the 4 float bowl screws and remove the float bowl cover. When you remove the cover gas will spill out of the bowl, not much will come out but I suggest having a rag under the carb so it doesn't spill all over the bike.
This picture is of the front carb float bowl
Locate the Main jet and the Pilot Jet (If you are replacing the pilot jet). Remove the stock jets and replace them with your new ones.
Picture of the rear carb.
The rear carb is very similar to the front, although the jets are in different locations inside the float bowl and the pilot jet looks different then the front. It is not difficult finding them. There ya go, that's all theirs to it. All you have to do is reverse the process and put the carbs back and re-attach the airboxes if you have that setup. After i got my bike re-assembled I started it up, and it ran smooth. Unfortunately it is the middle of the winter here in Wisconsin so i could only bear a ride around the block. The bike performed very well with a noticeable power increase considering it was around 10 degrees that day.
This is intended only to serve as a guide to show how the process is done. You must have some mechanical knowledge and be able to identify certain parts on a motorcycle to be successful in doing a stage 2 install.
"Hunter"
Suzuki M1800R - no rules great fun
http://www.watou-info.be

"Hunter"- modérateur

- Messages : 6
Date d'inscription : 04/05/2013
Age : 63
Localisation : Belgium Poperinge -

Re: reglage du dynojet stage 2
par Invité 24/11/2013, 11:30
Merci pour ce tuto.
Moi, j'ai donné.
Celui ci te permet d'installer ton kit en environ 1h, 1h30.
Aucuns réglages ne sont mentionnés pour st2.
La particularité, c'est qu'il est obligatoire d'installer 2 filtres k&n. (non compatible avec stage 1 et config d'origine). J' en ai fait l'experience car le kit stage 2 contient aussis les elements du stage 1.
La vis de richesse doit etre entre 4 tours et 4.5 tours.
Les gicleurs de ralenti ne sont pas fournis et pourtant ils ne sont pas adaptés.
J'ai du fabriquer une cale au starter avec un bout de durite pour supprimer les trous.(environ 6mm).
J'essaierai peut etre l'an prochain de m'attaquer à ces gicleurs pour eviter de rouler au starter.
Resultat: ça vaut le coup.ça marche nettement plus fort et jolit bruit d'admission.
Invité- Invité
Page 1 sur 1
Permission de ce forum:
Vous ne pouvez pas répondre aux sujets dans ce forum|
|
|